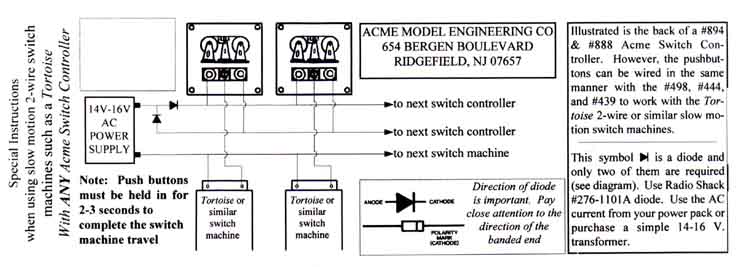
Instructions for #894 and #888 Switch Controllers with Indicator Lights
IMPORTANT: To avoid damage, remove bulbs before soldering wires to sockets.
Instructions for Slow Motion Switches on bottom of this page, please scroll down.
The model 894 is designed for flush mounting into a control panel. We suggest using 3/4" wood or 1/2" plywood for the mounting surface. However, any type wood is suitable
for this purpose. Figure 3 indicates one of several methods appropriate for mounting the #894. Use a 1-1/2" hole saw to make the mounting hole for the controller.
For more than one controller, drill holes on 1-3/4" centers, either vertically or horizontally. You may also devise your own method of mounting.
The model 888 is designed for surface mounting onto a control panel or layout board. DO NOT OVERTIGHTEN THE SUPPLIED SHEET METAL SCREWS. When mounting the aluminum frame,
carefully guide all wires through the access hole in the bottom or back of the frame. Be certain that no bare wires are touching each other or the aluminum frame.
For both the model 894 and 888, exercise extreme care when soldering the wires to the terminals. We recommend 22 gauge or thinner STRANDED wire. In no case use heavier wire or solid wire.
The center terminal of the controller will move slightly when the button is depressed, therefore the wire must not restrict movement of the contact blade or terminal.
BUTTONS MUST ALWAYS BE PRESSED FIRMLY TO ACCOMPLISH FULL CONTACT. IF BOTH LIGHTS STAY ON, IT IS BECAUSE THE BUTTON WAS NOT PRESSED FIRMLY.
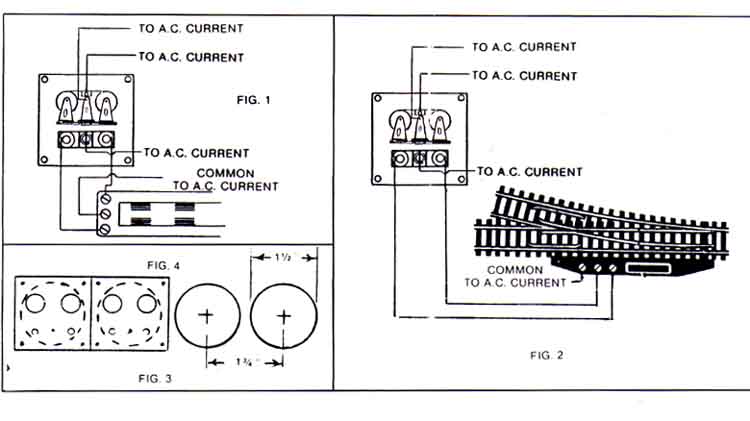
See figures 1 and 2 for the wiring diagrams. Two wires from your 12 to 16 VAC source of the power supply will be sufficient for the lights on all your controllers.
There is no need to wire each controller separately to your power pack. We suggest using our #416 or #516 terminal panel for this purpose.
For all other switches, wire as in figure 1 and connect the three wires as shown to your switch or switch machine.
If the AC current from your power supply is more than 16 volts, we suggest purchasing 18-20 volt bulbs(catalog #500). The painted surface of the controller is very durable.
However, if during installation damage to the black surface occurs, it can be colored with a black felt marker.
WARNING: Do not try to adjust or modify any moving parts of your controller. The parts have been factory adjusted.
WARNING: The indicator bulbs can become quite hot and cause burns. Avoid touching the light bulbs.