Instructions for #498 and #444 Switch Controllers with Indicator Lights
BULB REPLACEMENT
This item was packed with bulbs enclosed.
For replacement purposes it is
Socket size is "miniature screw". Bulb is universally known as a 1449. It is 14 volt, but a 12 volt will also work.
These can be found online, you can color them yourself.
IMPORTANT: To avoid damage, remove bulbs before soldering wires to sockets.
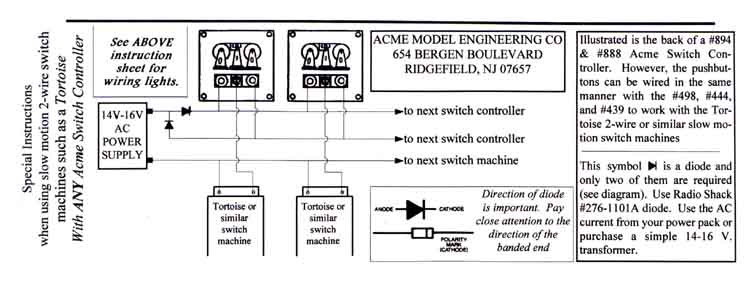
Instructions for Slow Motion Switches on bottom of this page, please scroll down.
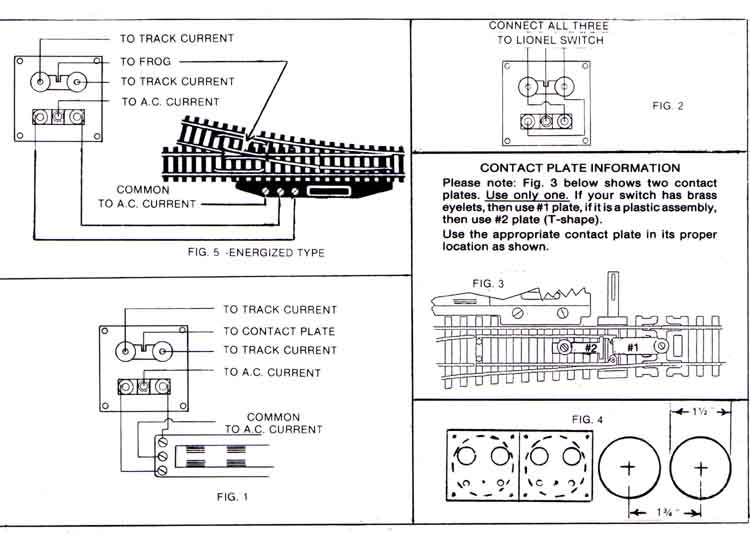
The Acme contact plate (see Fig. 3) is used for all HO switches where the frog is insulated. If you are using a switch with an energized frog, such as the Atlas Customline Supreme, then the contact plate is unnecessary.
Merely wire the tab located between the two sockets directly to the energized frog (see Fig. 5). This can be done by carefully inserting the wire into one of the two eyelets that hold the frog in place, preferable from underneath.
If you are using separate switch machines, such as Tenshado or others with built-in contacts, the lights can be wires to these contacts, using the AC current from your power pack (see wiring instructions with the switch machine).
For Lionel switches, connect wires directly to the controller (Fig. 2). Some Lionel switches, depending on when and where they were manufactured, will not activate the bulbs properly. In such cases, you will need to improvise some
sort of contact plate yourself to get the lights to work.
If you are using the mounting frame for surface mounting, be certain to string all the wires through the access hole in the bottom or back of the frame.
If the controller is to be used as a hand held unit, then the wires would come out either end of the frame. CAUTION: WHEN USING THE MOUNTING FRAME, BE CERTAIN NO BARE WIRES ARE TOUCHING THE FRAME. ALSO, DO NOT OVERTIGHTEN THE SHEET METAL SCREWS.
1. Install contact plate (see Fig. 3), using screw and washer to hold it down securely. If your switch is not mounted on wood or other material that will hold a screw,
then you can cement the contact plate in place making sure that you have a wire carefully soldered with minimum heat to the contact plate before cementing. Wiring of snap type switches shown in Fig. 1.
2. Center the contact plate perfectly and check alignment. Be certain the switch point eyelets touch the contact plate individually with equal pressure.
Be careful that both eyelets do not touch the plate at one time. This would cause a short.
3. If the contact plate offers too much resistance to switch point travel, carefully pull up the contact plate to reduce spring pressure.
For "N" gauge switches, you must improvise a contact plate, possibly cutting the plate to fit your switch.
Fig. 4 shows one of the many methods the #498 can be mounted. Cut 1-1/2" holes with a 1-1/2" hole saw. Put holes in on 1-3/4" centers for a row of controllers, or you can devise your own method of mounting.
The Acme contact plate can be used in many ways, such as operating signals, blocks, etc. With a little imagination, you will find many uses for extra Acme Contact Plates.