Instructions for Acme Switch Control Panels WITHOUT Lights
Use the voltage recommended by the manufacturer of your particular switch machine or switch motor.
Be certain to wire the connections so that the red button will indicate turn, and the green button will show straight. In this way, you will know which direction your train will run when you press the button.
If you are using the mounting frame for surface mounting, be certain to string all the wires through the access holes in the bottom or back of the frame.
If the controller is to be used as a hand held unit, then the wires would come out either end of the frame. CAUTION: WHEN USING THE MOUNTING FRAME, BE CERTAIN NO BARE WIRES ARE TOUCHING THE FRAME. ALSO, DO NOT OVERTIGHTEN THE SHEET METAL SCREWS.
For flush mounting, provide opening in your control center to fit whatever size Acme controller you are using.
This must be done so that none of the moving contacts of the controller are restricted or touching the sides of the opening.
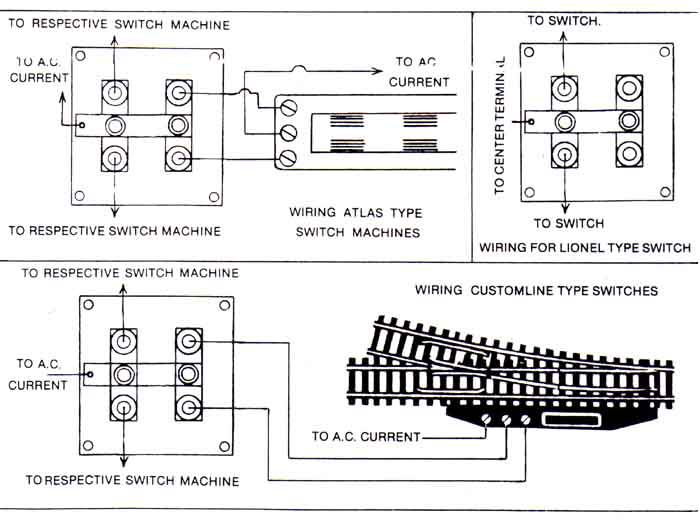
Note that the center connection is a “common”. If more that one panel is being used, then simply connect all center “common” terminals to one another and to your AC power supply.
Wiring is the same for all sizes of switch control panels. The illustration is the #302 or #402 for two switches. Mount self-stick numbers to control panel to identify switch that is activated.
NOTE: ACME CONTROLLERS MAY BE USED ANYWHERE A MOMENTARY CONTACT SWITCH IS NEEDED. IT CAN BE USED TO OPERATE ALL ELECTRICAL EQUIPMENT, (LOW VOLTAGE) ELECTRICAL UNCOUPLERS, AND MOMENTARY OPERATION OF SIDINGS, ETC.
Below are Special Instructions when using Slow Motion 2-wire Switch Machines
such as Tortoise, with ANY Acme Switch Controller.
